Processing

Quantitative PCR (qPCR), also known as real-time PCR (RT-PCR), is the method of choice for precise quantification of gene expression. qPCR can utilize a variety of probe-based methods such as 5′ nuclease dual-labeled probes, molecular beacons, and FRET probes, or use intercalating fluorescent dyes such as SYBR® Green (Life Technologies, Inc.). 5′ nuclease assays have the advantage of the precision that comes with using a sequence-specific, dual-labeled probe, and is the preferred technique for gene expression analysis. This article will focus on 5′ nuclease assay design and experimental setup considerations that will assist in obtaining accurate and consistent results.
Overview of 5' nuclease or probe-based qPCR steps
5’ nuclease qPCR probes, such as the ones included in IDT’s PrimeTime™ qPCR Probe Assays, are labeled with a 5′ fluorophore and 3′ dark quencher. Whenever the quencher and fluorophore are in proximity, no fluorescence is recorded. During the annealing step of a qPCR assay, the probe and PCR primers attach to their complementary sequences in the target region. Then, during primer extension or elongation, the exonuclease activity of DNA polymerase degrades the probe, releasing the 5’ fluorophore from the quencher. Without a quencher in proximity, the fluorescence is recorded by the qPCR instrument. The amount of fluorescence correlates with the amount of PCR amplicons created in each cycle of amplification.
Assay design
A well-designed assay begins with an understanding of the gene of interest, including knowledge of the transcript variants and their exon organization. Following are recommendations to help you prepare your next qPCR gene expression analysis.
Know your gene
Use NCBI databases such as GenBank®, Ensembl, Gene, and dbSNP to identify exon junctions, splice variants, and SNP locations.
- For genes with multiple transcript variants, align related transcripts to understand exon overlap using a program such as Clustal Omega (EMBL-EBI), or any of the NCBI online tools.
- For splice-specific designs, target primers and probe(s) within exons unique to the transcript(s) of interest, and BLAST™ primer and probe sequences to confirm that they do not occur in other related transcripts (see the article, Using BLAST to find primers—Tips from IDT).
- For splice common designs, target primers and probe within exons found across all transcript variants.
- Confirm lack of cross reactivity with other genes within the species using BlastN.
Primer and probe design criteria
Once the target exons have been identified for design, use the following criteria to select primers and probe.
Primers
- Tm: Primer Tm values should be similar (+/-2°C). For 5′ nuclease qPCR assays, Tm values are normally approximately 60−62°C.
- Primer length: Aim for 18−30 bases in length. This length typically yields a Tm of ~60−62°C.
- GC content: Avoid runs of >4 Gs to prevent formation of G quadruplexes. GC content should range from 35−65% (ideally, ~50%).
- Sequence: Avoid sequences that may create secondary structures, self-dimers, and heterodimers. Use the free IDT online OligoAnalyzer™ Tool to identify any such structures.
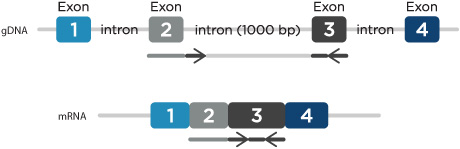
- Location—minimize genomic DNA amplification: If measuring gene expression, prevent amplification of genomic DNA by designing primers to span exon-exon junctions and have the probe binding site be positioned across the junction. Alternatively, design primers within 2 adjacent exons spanning a large intron (greater than 500 nucleotides in length) (Figure 1). Under normal qPCR cycling conditions, amplification of this large PCR product would not be favored. A DNase treatment of the RNA before using reverse transcriptase to make cDNA can also be incorporated to avoid gDNA amplification.
- Location—avoid repeated sequences: BLAST potential primer sequences and redesign them when they cross react in multiple places in the genome. Also consider primer location relative to SNPs. SNPs underlying the 3' primer end will have an impact on amplification.
Probe
- Tm: To help obtain accurate amplification measurements, the probe Tm value should be 5−10°C higher than that of the primers. A probe with a higher Tm than the primers should anneal to the template prior to the primers annealing.
- Length: Limit probe length to 30 bases when using dual-labeled probes designed with most common quenchers, as beyond this length quenching ability is decreased. However, you can design longer probes if you include an internal quencher, such as the IDT ZEN™ quencher (see the article, Double-quenched probes increase signal to noise ratios by decreasing background fluorescence).
- GC content: To prevent G quadruplex formation, minimize the number of consecutive Gs (less than 4). GC content should range from 30−80%.
- Sequence: Avoid a G base at the 5′ end as it has been observed that G bases can have a quenching effect on dyes such as FAM and other fluorescein derivatives [1].
- Location: Probes can be designed to bind to either the sense or antisense strand.
Amplicon
Length: For typical cycling conditions, ideal amplicon size is between 70 and 200 bp. Longer amplicons can be designed, but cycling conditions should be adjusted to include longer extension times. Generally, slightly longer amplicons are used for SYBR-based assays than for probe-based assays to enable differentiation from primer dimers on a melt curve.
Experimental setup and controls
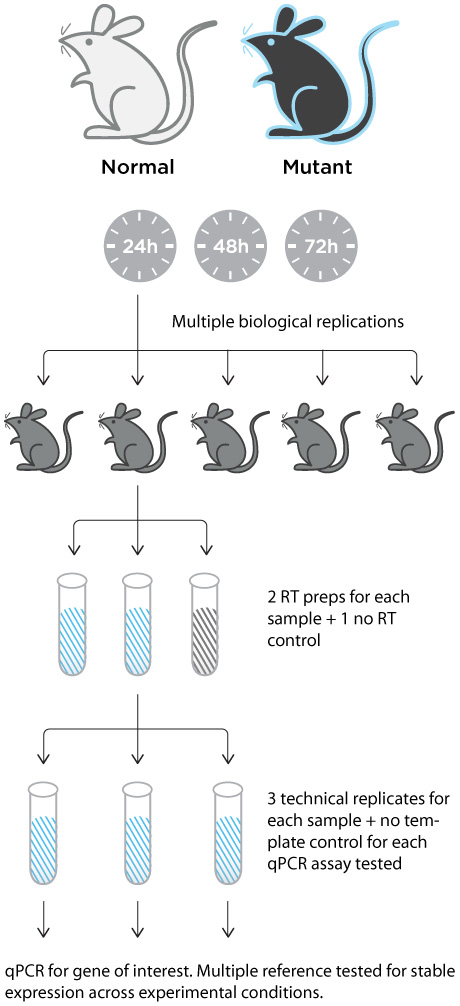
For accurate analysis of qPCR results, each experiment needs to be set up with multiple replicates and controls (Figure 2).
Replicates: For each experimental and control sample to be compared, at least three technical replicates are necessary to minimize errors in measured gene expression due to pipetting.
Controls and considerations for qPCR
- No RT control: For each reverse transcription reaction, it is important to incorporate a “no RT control” to identify erroneous signal due to genomic DNA contamination.
- No template control: During qPCR setup, incorporate a “no template control” for each different gene analyzed to identify possible cross-contamination generated during preparation of samples.
- cDNA amount: The amount of cDNA mixture added to the reaction should not exceed 1/10th the total reaction volume. Even better is to include a control with a 10-fold dilution of the cDNA along with a no dilution of cDNA to make sure there are no PCR inhibitors in the cDNA reaction.
- Reference genes: Multiple reference genes should be analyzed for stable gene expression. Select a reference gene with an expression pattern that is unaltered by treatment or the different time points to be tested.
- Cycling conditions: Always follow the cycling conditions according to the master mix used. For example, do not use a standard master mix with fast cycling conditions.